In the Polkadot ecosystem, developers of decentralized applications (dApps), web pages, and wallets typically develop using JavaScript and TypeScript. Interacting with blockchains based on the Polkadot SDK has traditionally relied on the Polkadot JS library. However, a new tool that has recently attracted much attention has emerged in the Polkadot ecosystem - Polkadot-API (PAPI) , which provides a more modern, modular development experience and is optimized for light clients. This article will introduce the characteristics of PAPI, environment construction, basic usage, and its advantages in actual development .
Features of PAPI
Polkadot-API (PAPI) is a modular, composable library for decentralized application (dApp) developers, specifically designed for a " light client first " approach. Its goal is to provide a comprehensive set of tools to help developers build efficient, fully decentralized applications. PAPI has the following features:
Light client optimization: Supports fully decentralized interactions through a new version of the JSON-RPC specification .
Powerful TypeScript support: Automatically generate type definitions and documentation through on-chain metadata, simplify development work, and enable seamless access to on-chain storage, constants, transactions, events, and runtime calls .
Multi-chain compatibility: Allows developers to connect to multiple blockchains simultaneously and provides multi-descriptor support and runtime update compatibility checks .
Performance optimization: Leverage native BigInt types , dynamic imports , and modular subpaths to avoid bundling unnecessary resources, thereby improving performance.
Flexible API options: Supports promise-based and observable APIs , facilitates integration with Polkadot.js , and provides signing options via browser extension or private key.
All of this makes PAPI an ideal tool for building decentralized applications, which not only improves development efficiency but also optimizes application performance and scalability . From a practical point of view, one of the most attractive features of PAPI is that it can easily generate TypeScript type definitions based on the chain's Metadata . For detailed documentation, please refer to the Polkadot official documentation or visit the PAPI official website.
🔗Polkadot official documentation :
https://docs.polkadot.com/develop/toolkit/api-libraries/papi/
🔗 PAPI official website : https://papi.how/
Environment Construction
Install Dependencies
First we need to install it, either through npm or yarn .
npm i polkadot-apiyarn add polkadot-api
Get the chain's metadata
Like Polkadot's relay chain, it already has default support in the script and can be obtained directly by name . When you run help, you can get a list of polkadot, kusama and their system parallel chains.
npx papi add -hUsage: polkadot-api add [options] <key>
Add a new chain spec to the list
Arguments: key Key identifier for the chain spec
Options: --config <filename> Source for the config file -f, --file <filename> Source from metadata encoded file -w, --wsUrl <URL> Source from websocket url -c, --chainSpec <filename> Source from chain spec file -n, --name <name> Source from a well-known chain (choices: "ksmcc3", "ksmcc3_asset_hub", "ksmcc3_bridge_hub", "ksmcc3_encointer", "ksmcc3_people", "paseo", "paseo_asset_hub", "paseo_people", "polkadot", "polkadot_asset_hub", "polkadot_bridge_hub", "polkadot_collectives", "polkadot_people", "rococo_v2_2", "rococo_v2_2_asset_hub", "rococo_v2_2_bridge_hub", "rococo_v2_2_people", "westend2", "westend2_asset_hub", "westend2_bridge_hub", "westend2_collectives", "westend2_people")
You can give a name when adding
npx papi add dot -n polkadotIt is also possible to add a chain that is not in the list, using the -w option . We start a chain with the local server, using the default port, and add it.
npx papi add asset -w ws://10.0.0.11:9944After successfully adding, a hidden directory named .papi will appear in the project directory, which will generate type files based on the obtained Metadata.
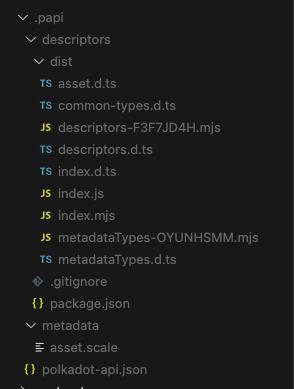
The principle is to add a dependency in packagejson, including the descriptor .
"dependencies": {"@polkadot-api/descriptors": "file:.papi/descriptors",
Programming Experience
In order to view the background log for debugging, the code interacts with the local node. From the official documentation, the client supports different modes , such as Smoldot. Here we only demonstrate the basic web mode.
Get Client API
First, specify the RPC node address and port of the chain through the ws provider, and then initialize a client. All types are obtained through the getTypedApi method , which is very convenient and very friendly to developers who are accustomed to strong type programming.
The definition of the type is generated using the command in the previous step.
import { asset } from '@polkadot-api/descriptors';import { createClient } from 'polkadot-api';import { getWsProvider } from 'polkadot-api/ws-provider/web';
async function main() { const provider = getWsProvider('ws://10.0.0.11:9944'); const client = createClient(provider); const dotApi = client.getTypedApi(asset);
Get constants and variables
Then you can simply interact with the chain through the API, here you get a constant and variable in balances . The code prints out the minimum balance of the account and the available balance of account Alice respectively.
import { asset } from '@polkadot-api/descriptors';import { createClient } from 'polkadot-api';import { getWsProvider } from 'polkadot-api/ws-provider/web';
async function main() { const provider = getWsProvider('ws://10.0.0.11:9944'); const client = createClient(provider); const dotApi = client.getTypedApi(asset); const existentialDeposit = (await dotApi.constants.Balances.ExistentialDeposit()).toString(); console.log(existentialDeposit); const balance = await dotApi.query.System.Account.getValue("5GrwvaEF5zXb26Fz9rcQpDWS57CtERHpNehXCPcNoHGKutQY"); console.log(balance["data"]["free"].toString()); }
main()
Sending Transaction
Here we complete the simplest transfer operation from Alice to Bob . After getting the API, we import Alice and Bob's accounts respectively, initialize Alice's signer, and convert Bob's public key into MultiAddress format. Finally, sign and send the transaction.
import { MultiAddress } from "@polkadot-api/descriptors"import { asset } from '@polkadot-api/descriptors';import { createClient } from 'polkadot-api';import { getWsProvider } from 'polkadot-api/ws-provider/web';import { getPolkadotSigner } from "polkadot-api/signer"import {sr25519,DEV_PHRASE,entropyToMiniSecret,mnemonicToEntropy, ss58Address} from "@polkadot-labs/hdkd-helpers"import { sr25519CreateDerive } from "@polkadot-labs/hdkd"
async function main() { const provider = getWsProvider('ws://10.0.0.11:9944'); const client = createClient(provider); const dotApi = client.getTypedApi(asset);
const entropy = mnemonicToEntropy(DEV_PHRASE) const miniSecret = entropyToMiniSecret(entropy) const derive = sr25519CreateDerive(miniSecret)
const alice = derive("//Alice") const bob = derive("//Bob") const signer = getPolkadotSigner(alice.publicKey, "Sr25519", alice.sign)
const dest = MultiAddress.Id(ss58Address(bob.publicKey)) const result = await dotApi.tx.Balances.transfer_keep_alive({ dest, value: BigInt(123), }).signAndSubmit(signer) console.log(result) } main()
When the transaction is successfully completed, the result format is as follows
{txHash: '0x803428a07a2e1c6de378e84a01249bc4f237df546a719bcd369e0418800f54cc',block: {index: 2,number: 1162,hash: '0x17aeb0944a33b848655c6fc3945bae1a3bd436e5fe92b0f15a2d7fe027764cc7'},ok: true,events: [{ type: 'Balances', value: [Object],{ type: 'Balances', value: [Object], topics: [] },{ type: 'Balances', value: [Object], topics: [] },{ type: 'Balances', value: [Object], topics: [] },{ type: 'Treasury', value: [Object], topics: [] },{ type: 'Balances', value: [Object], topics: [] },{ type: 'TransactionPayment', value: [Object], topics: [] },{ type: 'System', value: [Object], topics: [] }]}
Listening for events
In the development of Dapp, event processing is also essential. The following code demonstrates how to obtain the chain .
import { asset } from '@polkadot-api/descriptors';import { createClient } from 'polkadot-api';import { getWsProvider } from 'polkadot-api/ws-provider/web';
async function main() { const provider = getWsProvider('ws://10.0.0.11:9944'); const client = createClient(provider); const dotApi = client.getTypedApi(asset); dotApi.event.Balances.Transfer.watch().pipe().forEach(console.log) } main()
The event format obtained is as follows. You can also apply some filters to the listener, such as sender, receiver address, etc. You can try these yourself.
{meta: {phase: { type: 'ApplyExtrinsic', value: 2 },block: {hash: '0x9aa50c25fcc0801ab98d588a8faf8648a98b51adc01ebe2816e381348e6275c2',number: 1078,parent: '0xcf12ee84af9eff68b525d1d0c6a6b032accc914e80f05ed78b4d62d8170e076c'}},payload: {from: '5GrwvaEF5zXb26Fz9rcQpDWS57CtERHpNehXCPcNoHGKutQY',to: '5FHneW46xGXgs5mUiveU4sbTyGBzmstUspZC92UhjJM694ty',amount: 1000000000000n}}
Summarize
Compared with the traditional Polkadot JS library, PAPI provides a more modern development experience, especially the automatic generation of TypeScript type definitions, which enables developers to understand the on-chain data structure more clearly, greatly improving development efficiency . Its modular design, light client-first strategy, and multi-chain compatibility make it a new tool worthy of attention in the Polkadot ecosystem. Of course, since PAPI is still being optimized, developers may encounter some bugs during use. Everyone is welcome to actively feedback and contribute PR . I hope that PAPI can further promote the development of the Polkadot ecosystem and provide developers with a more convenient way to interact with blockchains!
"Blockchain Technology Development Introduction 17th Edition" is now open for registration
The "Blockchain Technology Development Introduction 17 | Solidity Development on Polkadot" jointly launched by OneBlock+ and Polkadot is about to start! This course will officially start on March 7, 2025 , lasting 6 weeks , including 6 recorded classes , 6 tasks and multiple workshops . Through systematic learning and practice, it will help you explore blockchain technology in depth and open a new chapter in the future of encryption!
✨ This course is completely free and open to the public. Admission is by application . The number of places is limited ! Click the link below to fill out the application form. We will contact you after the review is passed to lock in your place!
🔗Apply for admission now:
https://wj.qq.com/s2/17653871/18t2/